Table of Contents
Ever stared at a plain wall and thought, "It needs something"? I have, countless times. That's when I discovered the magic of tape and paint. It's not just about slapping color on a surface; it's about creating art, and you don't need to be a pro to do it. This article is your guide to transforming boring walls into stunning focal points using simple painter's tape. We're diving into the world of "tape accent wall paint pattern ideas", exploring how to create geometric designs, unique patterns, and even bold statements with just tape and a little paint. Forget expensive wallpapers or complicated techniques; this is all about simple, effective, and fun DIY. You'll learn how to choose the right tape, plan your designs, and execute them flawlessly. So, grab your tape and paint, and let's make some wall magic happen!
Getting Started with Tape for Wall Painting
Getting Started with Tape for Wall Painting
Why Tape is Your Best Friend
Okay, so you're thinking about adding some pizzazz to your walls, and you've heard tape can help. You're not wrong. Painter's tape is like the superhero of DIY wall art. It's not just for keeping paint off trim; it's your tool to create sharp lines, geometric shapes, and all sorts of cool patterns. Think of it as your design partner. Unlike freehand painting, which can be a bit, well, wobbly, tape gives you that crisp, clean look. It's like having a stencil, but you're making the stencil yourself. And the best part? It's super forgiving. Mess up? Just peel it off and try again. Trust me, I've done it more times than I'd like to admit.
Choosing the Right Tape
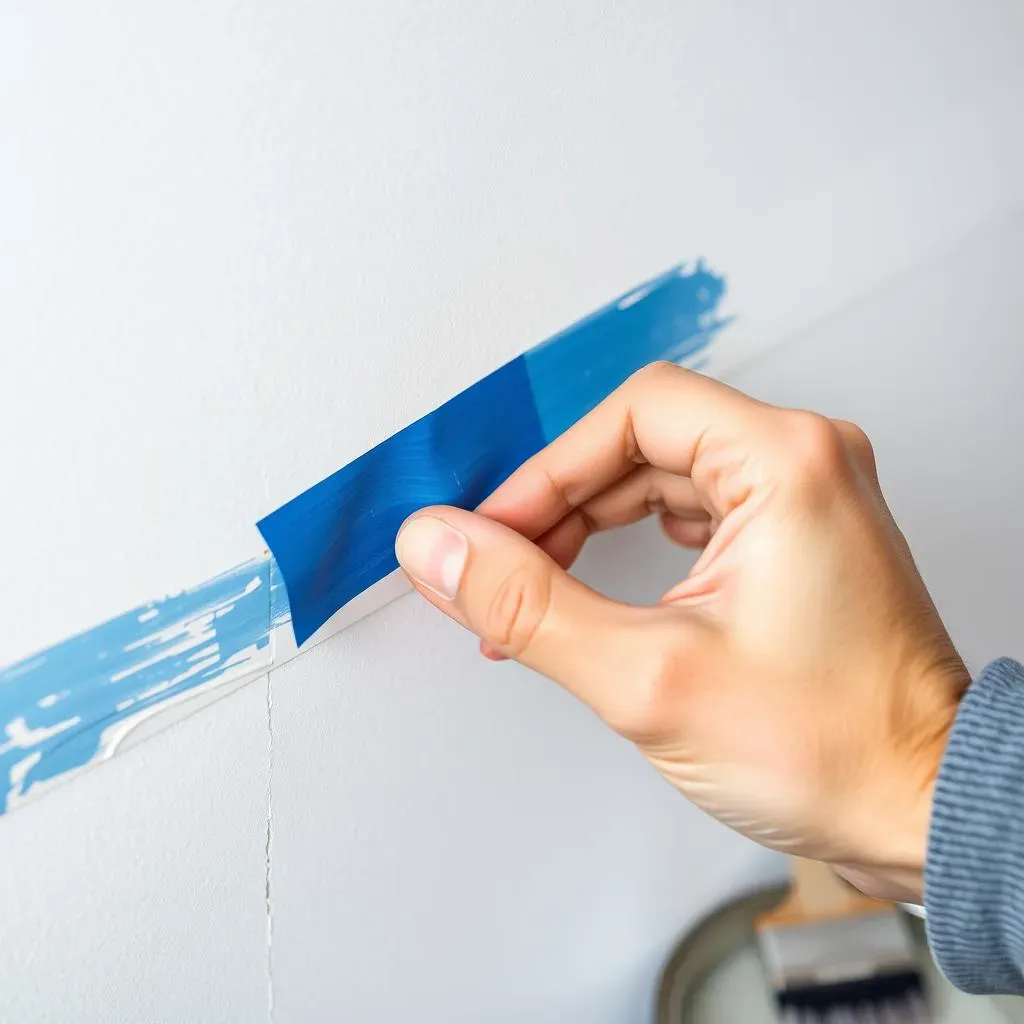
Not all tapes are created equal. You wouldn't use duct tape to hang a picture, right? Same goes for painting. You need painter’s tape, the kind that's designed to stick to walls without pulling off the paint. Look for the blue or green stuff. It comes in different widths, and for most wall designs, I usually go with a 1.5 or 2-inch tape. A wider tape is great for creating broad stripes or grids, while a thinner one is ideal for more detailed work. And here's a pro tip: Always apply the tape to a clean, dry wall. Any dust or moisture will make the tape less sticky, and you'll end up with paint bleeding under the edges. Nobody wants that.
Tape Type | Best Use | Width |
|---|---|---|
Blue Painter's Tape | General use, most surfaces | 1 to 3 inches |
Green Painter's Tape | Delicate surfaces, freshly painted walls | 1 to 3 inches |
Frog Tape | Sharp lines, minimal paint bleed | 1 to 3 inches |
Planning Your Design
Before you go wild with tape, take a breath and plan. Sketch out your design on paper or use a computer program if you're feeling techy. This step is crucial. It helps you visualize the end result and figure out how much tape you’ll need. Think about the overall look you want. Do you want a bold geometric design, subtle stripes, or maybe a playful confetti pattern? There are tons of ideas online, so don’t be afraid to do some research. Once you have a plan, grab a level and a ruler. You want those lines to be straight, unless you're going for a totally abstract look. Measure twice, tape once, as they say. And if you’re unsure about colors, do a practice grid on a piece of cardboard. This way, you can test different color combinations before committing to your wall. Trust me, it’s saved me from some serious color catastrophes.
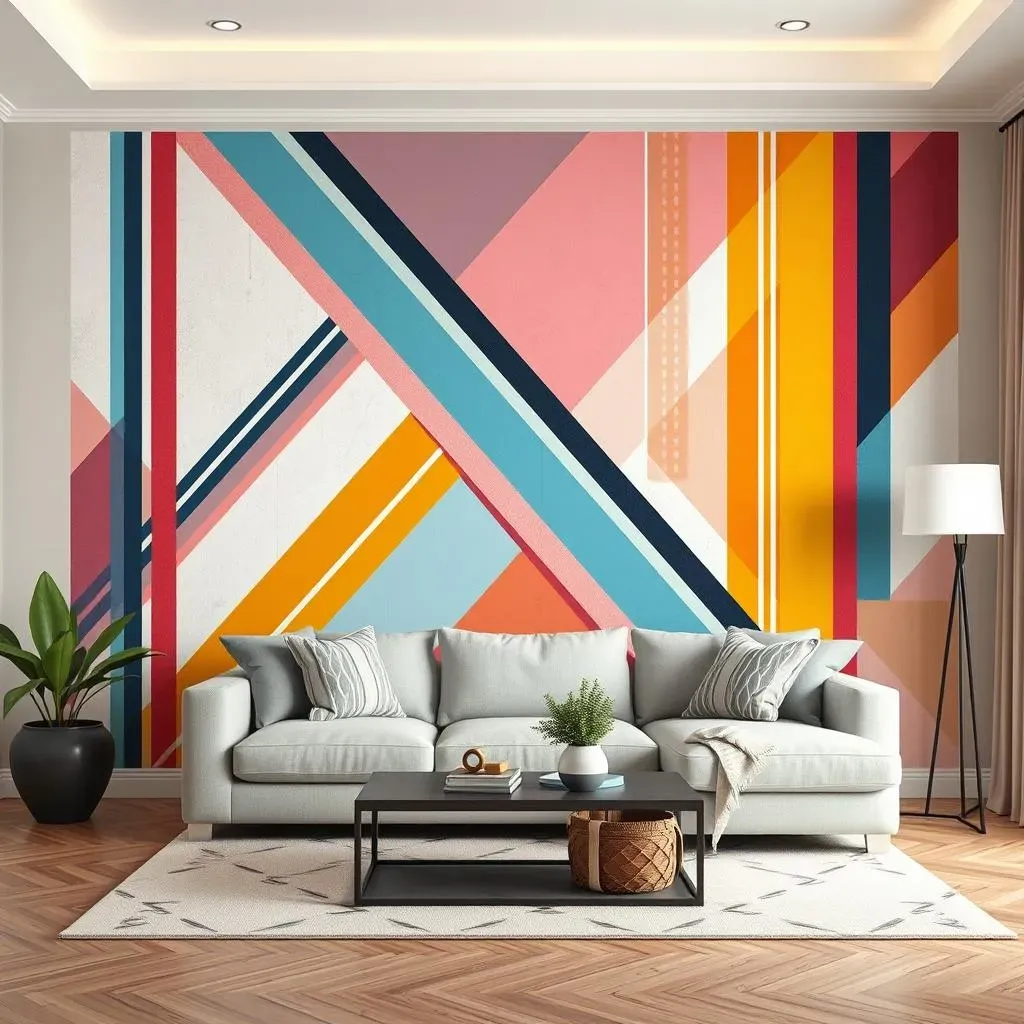
Geometric Tape Patterns for Walls
Geometric Tape Patterns for Walls
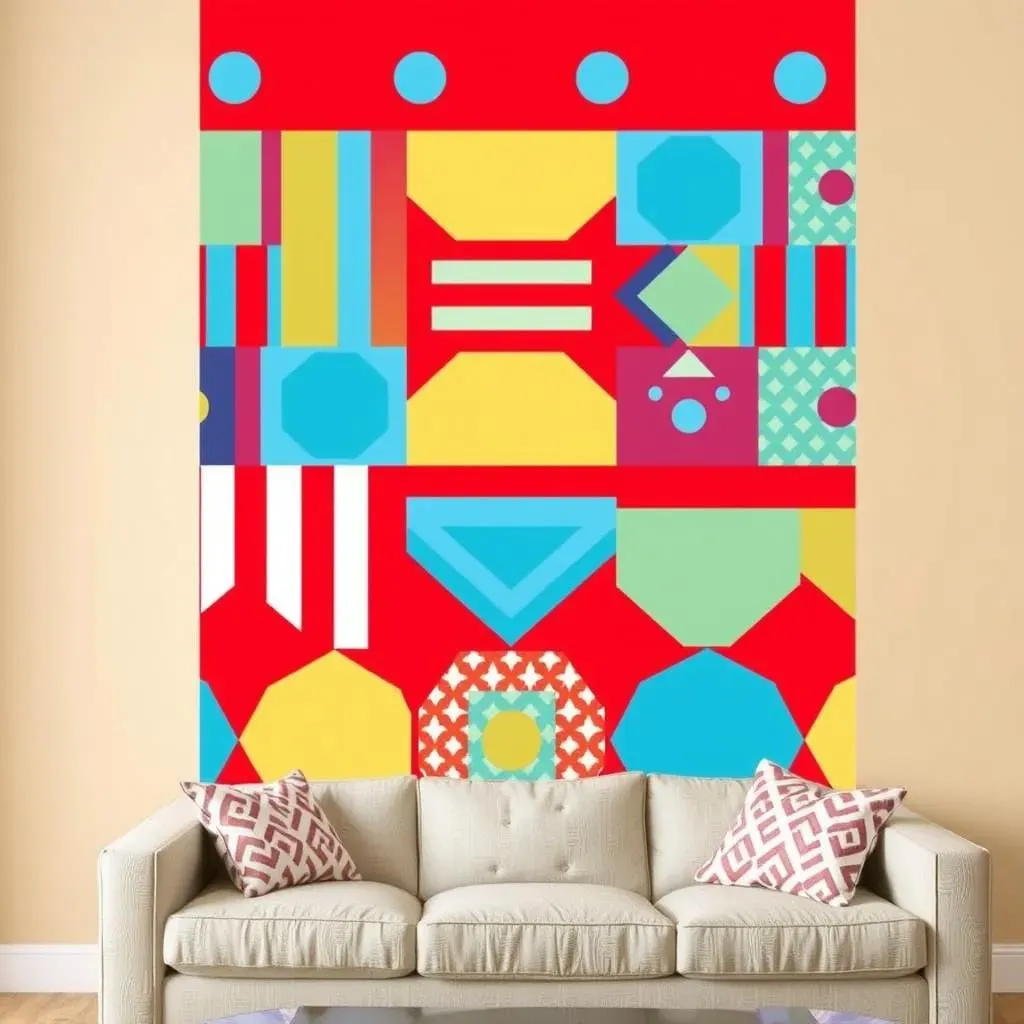
Alright, let's talk about geometric tape patterns, because this is where the real fun begins. Forget plain old stripes; we're going for shapes, angles, and all sorts of cool designs. Think about it: you can create diamonds, chevrons, triangles, or even complex geometric murals, all with just tape. The beauty of geometric patterns is that they can add a sense of order and modern flair to any room. And the best part? They look way more complicated than they actually are. I remember the first time I tried a chevron pattern; I was so intimidated, but once I got the hang of it, it was actually quite simple. It's all about breaking down the design into manageable steps. So, don't be scared to experiment a bit; this is where you can really show off your creativity.
When you're creating these patterns, remember that precision is your friend. A level is essential to ensure your lines are straight and your angles are accurate. And here’s a little tip: if you're doing a complex pattern, start with the main lines first, and then fill in the details. Also, use a wide tape for the base grid, this will make the process faster. Then, you can use a thinner tape for finer details. I like to use a credit card or a plastic scraper to firmly press the tape down, making sure all the edges are sealed. This prevents paint from bleeding under the tape and gives you those crisp, clean lines we all crave. It's like the difference between a blurry photo and a high-definition image – the details matter.
Essential Tools for Geometric Patterns
- Painter's tape (various widths)
- Level
- Ruler or measuring tape
- Pencil
- Credit card or plastic scraper
- Paint rollers or brushes
Now, let's get into the nitty-gritty of some specific patterns. Diamond patterns are fantastic for adding a touch of elegance; just create a grid of intersecting diagonal lines. Chevron patterns, with their zigzag look, are great for adding a dynamic feel. Triangles can be arranged in various ways to create an edgy and modern look. Don't be afraid to mix and match different shapes and directions; this is how you create a truly unique design. I once saw a wall that combined triangles and stripes in a really creative way, and it looked like a piece of art. Remember to take your time, plan each line, and trust the process. With a little patience, you can create a geometric masterpiece that will have everyone asking, "How did you do that?"
Creative Tape Wall Painting Techniques
Creative Tape Wall Painting Techniques
Beyond the Basics
Okay, so you've mastered the basics of straight lines and simple shapes. Now, let's get a bit more adventurous, shall we? Tape isn't just for creating geometric patterns; it's a tool for creating textures, effects, and all sorts of cool designs. Think about it: you can use tape to create faux paneling, add subtle stripes to existing wallpaper, or even make a bold statement with irregular shapes. It's like having a blank canvas, but instead of paintbrushes, your main tool is tape. I remember this one time I used tape to create a faux headboard; it looked like it was made of wood, but it was just paint and tape. People were amazed, and it was so easy to do. The key is to think outside the box and not be afraid to try new things. There are really no rules when it comes to using tape, just your imagination.
One cool technique is to use tape to create a "color block" effect. This involves painting large sections of your wall in different colors, using tape to create clean, crisp lines between each block. You can create all sorts of patterns with this. Another fun idea is to apply a base coat of paint, then layer tape on top to create a pattern, apply a second coat of paint, and then carefully remove the tape to reveal the design underneath. It's like creating a reverse stencil, and the effect can be really striking. And if you're feeling particularly brave, try using different widths of tape to create varying line thicknesses. It's all about playing around and seeing what works. I once saw a wall that used this technique to create a really cool "barcode" look, and it was absolutely stunning. The possibilities are endless.
Technique | Description | Difficulty |
|---|---|---|
Color Blocking | Painting large sections in different colors | Easy |
Reverse Stencil | Layering tape, painting over, and removing tape | Medium |
Varying Line Widths | Using different tape widths for different lines | Medium |
Advanced Techniques and Tips
Alright, let's talk about some advanced techniques, because once you get the hang of the basics, you're going to want to push the boundaries. One thing that I've found useful is to use tape to create textured effects. For example, you can apply tape in a random pattern, then apply a textured paint or a sponge to create a unique design. Then when you pull the tape off, you get a really interesting look. Another idea is to use tape to create a gradient effect, where the color gradually transitions from one shade to another. This is a bit more challenging, but with a bit of practice, you can create a really stunning effect. I saw someone who used this technique to create an ombre wall, and it looked like a piece of art. Remember, it's all about experimenting and having fun.
When you're trying these more advanced techniques, patience is key. Make sure you're using a good quality tape, and always press the edges down firmly to avoid paint bleed. Also, don't be afraid to use multiple layers of tape to create more complex patterns. And if you're not sure about a color combination, try it out on a small area first. This way, you can avoid any major disasters. I also like to use a small brush to touch up any areas where the paint may have bled under the tape. It's all about the details, and a little bit of effort goes a long way. The goal is to create something that's not only beautiful but also uniquely yours. So, go ahead, unleash your creativity, and make your walls a true reflection of your personality.
Tape Accent Wall Ideas for Every Room
Tape Accent Wall Ideas for Every Room
Living Rooms: Make a Statement
Okay, let's talk living rooms. This is where you can really go bold because it's often the heart of the home. Think of your living room walls as a blank canvas, ready for some serious tape magic. A popular idea is to create a large geometric mural. I once helped a friend create a huge, asymmetrical triangle design in her living room, and it completely transformed the space. It became this cool, modern focal point that everyone talked about. Another idea is to use tape to create a faux paneling effect, which adds a touch of elegance without having to install real wood panels. It's all about making a statement that reflects your personal style, and tape is the perfect tool for that. You can go for bold colors or subtle tones, depending on the vibe you're aiming for.
Another cool idea I've seen is using tape to frame a gallery wall. You can create a large rectangle or a more abstract shape on your wall, and then arrange your favorite artwork inside of it. It’s like a picture frame for your pictures. Also, stripes are always a classic, and you can play around with different widths and colors to create a unique look. A wide, horizontal stripe can make a room feel larger, while a vertical stripe can add height. I saw a living room with a bold, navy blue stripe running around the room, and it looked amazing. The key is to think about the overall feel you want to create and then use tape to bring that vision to life. Don't be afraid to experiment and have fun, this is where you can really show off your personality.
Room | Idea | Style |
|---|---|---|
Living Room | Geometric Mural | Modern, Bold |
Living Room | Faux Paneling | Elegant, Classic |
Living Room | Framed Gallery Wall | Personal, Eclectic |
Bedrooms: Creating a Calm Oasis
Moving on to bedrooms, here’s where you might want to create a more calming and relaxing atmosphere. While bold designs can work, many people prefer a more subtle touch in their sleeping space. One of my favorite ideas is to create a simple, horizontal stripe behind the bed. It’s a classic look that adds just the right amount of interest without being overwhelming. I know someone who did this in a soft, gray tone, and it made their bedroom feel so peaceful. Another idea is to use tape to create a subtle pattern on the wall, like a series of thin, vertical lines. It can add a touch of texture and sophistication without being too busy. Remember, your bedroom should be your sanctuary, so choose designs and colors that make you feel relaxed and at ease.
You can also use tape to create a unique headboard design. Instead of buying a traditional headboard, use tape to create a shape or pattern on the wall. It’s a cost-effective way to add a personal touch to your bedroom. I saw this really cool design that used tape to create a mountain range behind the bed, and it looked fantastic. Another option is to use tape to create a color block effect, where you paint different sections of the wall in complementary colors. This can create a sense of depth and dimension, making the room feel more inviting. The key is to think about the overall feeling you want to achieve in your bedroom and then use tape to create a space that’s both stylish and serene. Don’t be afraid to try new things and make your bedroom a true reflection of your personality.