Table of Contents
Ready to inject some serious drama into your space? A black accent wall is a bold move, but when done right, it can transform a room from bland to breathtaking. But before you grab that can of漆黑, there are a few things you need to know. This isn't just about slapping on some dark paint; it's about understanding how black interacts with light, space, and your existing décor. Ever walked into a room with a black accent wall that just felt…off? We're here to make sure that doesn't happen to you.
Choosing the Right Black Paint for Your Accent Wall Project

Choosing the Right Black Paint for Your Accent Wall Project
Understanding Black Undertones
so you're thinking black, right? But here's the secret: black isn't just black. It has undertones, subtle hints of other colors that can dramatically change the way it looks on your wall. Think about it – a black with a green undertone will feel very different from one with a red or blue undertone. These undertones become especially apparent in different lighting conditions, so what looks like a true black in the store might reveal its hidden hues once it's up on your wall. It's like choosing the right filter for a photo – it can make or break the whole vibe.
How do you spot these sneaky undertones? Compare paint swatches against a pure white surface in both natural and artificial light. You'll start to see the subtle differences emerge. Also, consider the other colors in your room. If you have warm wood tones, a black with a warmer undertone (like brown or red) will create a more harmonious feel. If your room is full of cool grays and blues, a black with a cooler undertone (like blue or green) might be a better fit. Don't be afraid to grab a bunch of swatches and experiment! It's the key to nailing that perfect black.
Exploring Paint Finishes for Black Accent Walls
The finish of your paint is just as important as the color itself. Do you want a velvety matte that absorbs light, a subtle eggshell that's easy to clean, or a dramatic gloss that reflects everything? Matte finishes are super trendy right now, giving a sophisticated, modern look. They're great at hiding imperfections on your wall, but they can be a little trickier to clean. Eggshell is a good all-around choice – it has a slight sheen, but it's still pretty forgiving. Semi-gloss and gloss finishes are the most durable and easiest to clean, making them ideal for high-traffic areas, but they'll also highlight any imperfections on your wall, so make sure it's prepped perfectly.
Consider the light in your room when choosing a finish. A matte finish will absorb light, making a small room feel even smaller and darker. A gloss finish will reflect light, making the space feel brighter and more open. You might even consider a specialty finish like chalkboard paint for a fun and functional accent wall in a kitchen or playroom. Ultimately, the best finish depends on your personal style and the specific needs of your space.
Testing Your Black Paint Choices
Alright, you've narrowed down your black paint options, you've considered the undertones and finishes. Now, before you commit to painting the entire wall, it's crucial to test, test, test! Paint a large swatch (at least 2ft x 2ft) on your wall in a few different spots, paying attention to areas that receive different amounts of light. Live with those swatches for a few days, observing them at different times of day and in different lighting conditions. You might be surprised at how much the color changes depending on the light!
This step is non-negotiable. Trust me on this one. I once painted an entire living room a gorgeous shade of gray, only to discover that it turned lavender in the afternoon light. Not the vibe I was going for! Testing your paint beforehand can save you time, money, and a whole lot of frustration. So grab those sample pots, get painting, and observe how your chosen black transforms throughout the day. It's the key to achieving accent wall perfection.
Factor | Considerations |
|---|---|
Undertones | Warm vs. Cool, compatibility with existing decor |
Finish | Matte, Eggshell, Gloss - Light reflection, durability, ease of cleaning |
Lighting | Natural vs. Artificial - How the color appears at different times of day |
Preparing Your Wall for a Flawless Black Accent Wall Finish
Preparing Your Wall for a Flawless Black Accent Wall Finish
Cleaning and Repairing Imperfections
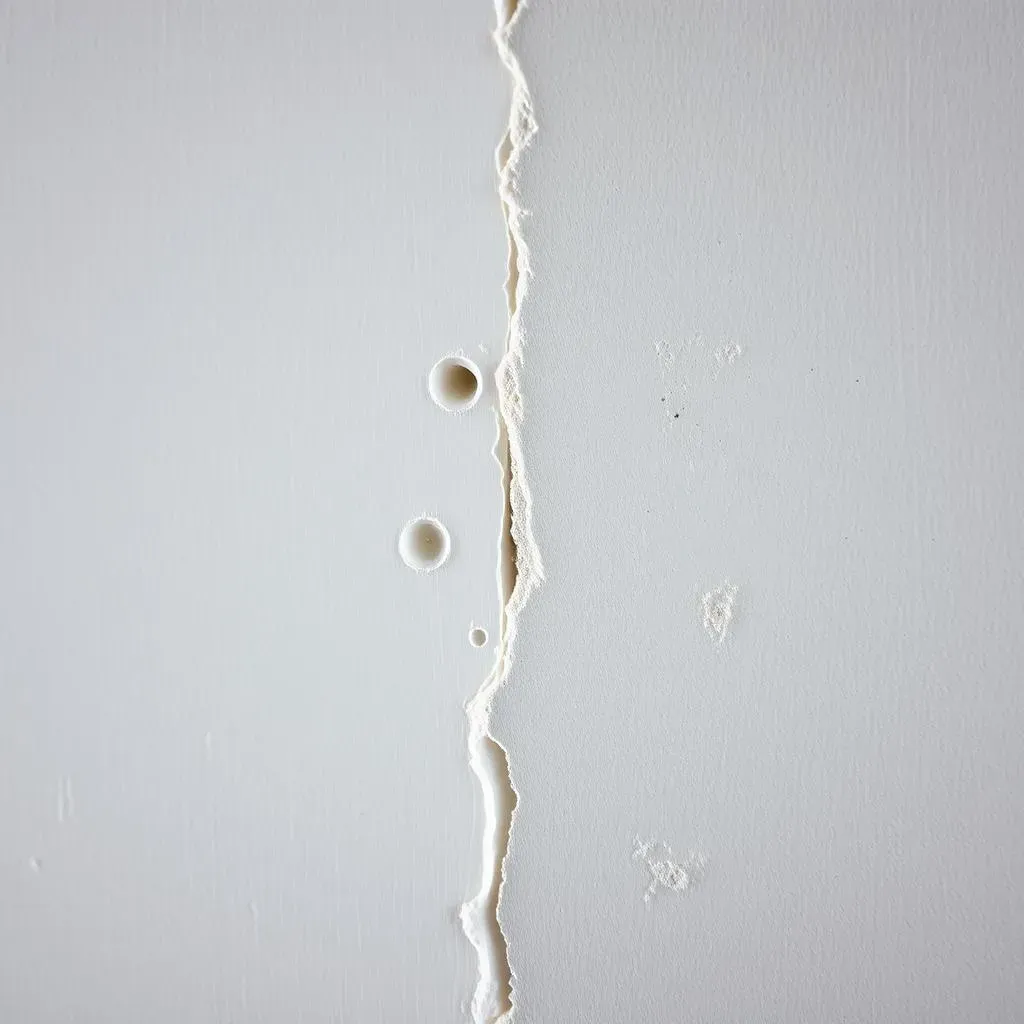
Alright, so you've got your dream black paint picked out. Awesome! But before you even think about cracking open that can, let's talk about the not-so-glamorous, but absolutely essential, step: prepping your wall. Think of it like this – your wall is the canvas, and the paint is the masterpiece. You wouldn't paint a masterpiece on a dirty, cracked canvas, would you? Exactly. The first step is a good scrub down. Use a damp sponge and some mild detergent to remove any dust, dirt, or grime. Pay special attention to areas that tend to accumulate dirt, like around light switches and baseboards. Once the wall is clean, let it dry completely.
Next up, repairs! Black paint, especially in a matte finish, has a way of highlighting every single imperfection. So, now's the time to fill any nail holes, cracks, or dents with spackle or joint compound. Let the spackle dry completely, then sand it smooth with fine-grit sandpaper. You want the patched areas to blend seamlessly with the rest of the wall. Wipe away any sanding dust with a tack cloth before moving on. Trust me, taking the time to properly repair your wall will make a world of difference in the final result. It's the foundation for a flawless black accent wall.
Priming for Optimal Black Paint Coverage
your wall is clean, repaired, and smooth as a baby's bottom. Now, let's talk primer. I know, I know, it's another step, but trust me, priming is especially crucial when painting with black. Primer creates a smooth, even surface for the paint to adhere to, ensuring better coverage and a more uniform color. It also helps to block any stains or imperfections from bleeding through the black paint. Choose a high-quality primer that's designed for interior walls. If you're painting over a dark color or a glossy surface, you might even consider using a tinted primer – a gray-tinted primer can help to minimize the number of coats of black paint you'll need.
Apply the primer using a roller, just like you would with paint. Start by cutting in around the edges of the wall with a brush, then fill in the rest of the wall with the roller. Make sure to apply an even coat of primer, avoiding any drips or runs. Let the primer dry completely according to the manufacturer's instructions – usually, this takes a few hours. Once the primer is dry, you're ready to move on to the fun part: painting your black accent wall! But remember, proper prep is the key to a professional-looking finish.
Step | Description | Why it's Important |
|---|---|---|
Cleaning | Wash wall with mild detergent and water | Removes dirt and grime for better paint adhesion |
Repairing | Fill holes and cracks with spackle, sand smooth | Creates a smooth, even surface |
Priming | Apply a coat of high-quality primer | Ensures better coverage and prevents bleed-through |
StepbyStep Guide: How to Paint a Black Accent Wall
StepbyStep Guide: How to Paint a Black Accent Wall
Gathering Your Supplies
the prep work is done, and now it's time for the main event! Before you even think about dipping that brush, make sure you have everything you need within arm's reach. Nothing's worse than getting halfway through a coat of paint and realizing you're missing a crucial tool. So, let's run through the checklist: You'll need your chosen black paint, of course, along with a high-quality paint brush (an angled brush is great for cutting in), a paint roller and roller frame, a paint tray, painter's tape, drop cloths or plastic sheeting, a ladder or step stool (if needed), and some rags or paper towels for cleaning up any spills.
Pro tip: invest in good quality brushes and rollers! They'll make the job so much easier and give you a smoother, more even finish. Cheap brushes tend to shed bristles, which can ruin your paint job. And don't forget the painter's tape! Trust me, you'll want to tape off all the edges of your wall – the ceiling, the trim, the adjacent walls – to protect them from stray brushstrokes. It's a little extra work upfront, but it'll save you a ton of time and frustration in the long run. Now that you're armed with all the right tools, let's get painting!
The Painting Process: Achieving a Smooth, Even Finish
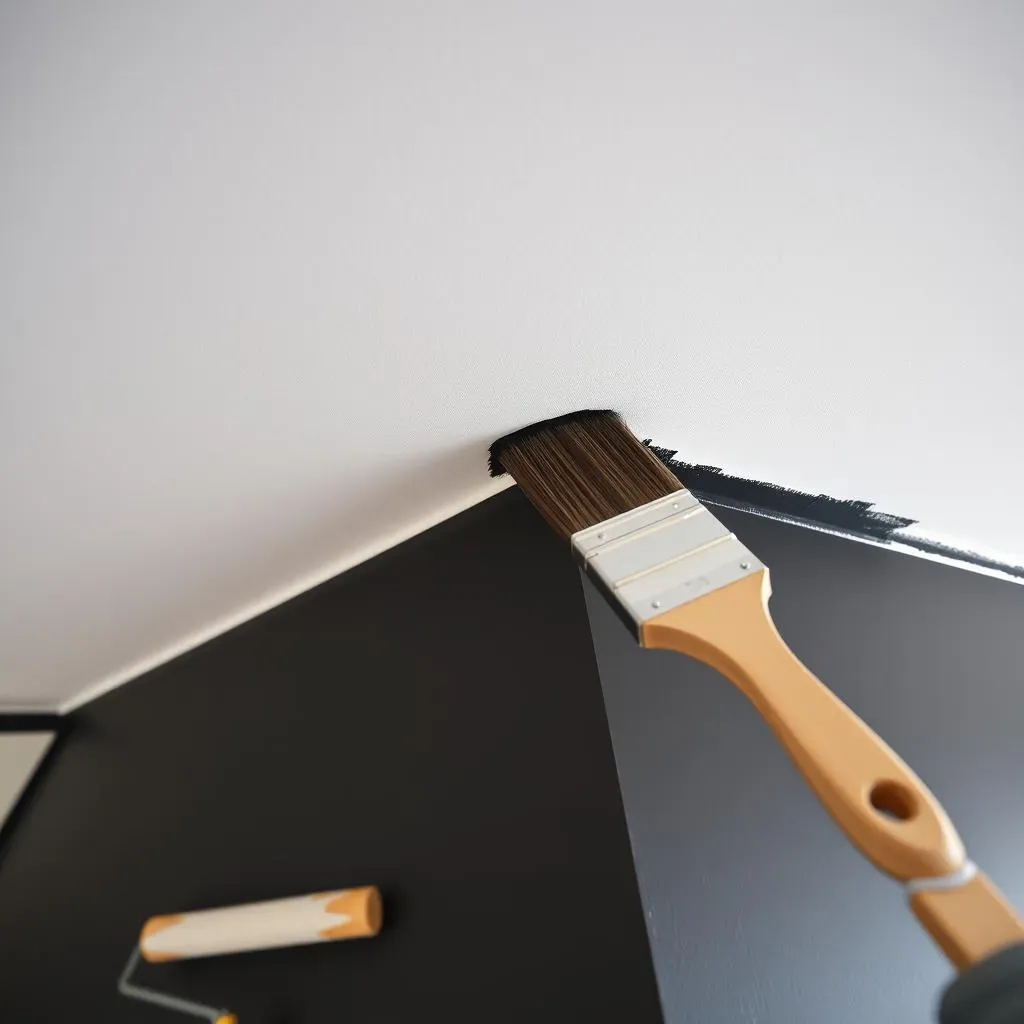
Alright, superhero, time to transform that wall! Start by "cutting in," which means painting a neat line around the edges of the wall where it meets the ceiling, trim, and adjacent walls. Use your angled brush for this, and try to keep a steady hand. Don't overload your brush with paint – a little bit goes a long way. Once you've cut in, it's time to roll! Pour some paint into your paint tray, and load up your roller, making sure to distribute the paint evenly. Start at the top of the wall and roll down in smooth, even strokes, slightly overlapping each stroke as you go. Work in small sections, and try to maintain a wet edge to avoid lap marks.
Once you've covered the entire wall with the first coat, let it dry completely according to the manufacturer's instructions. This is crucial! Don't be tempted to rush into the second coat before the first one is fully dry, or you'll end up with a gloppy, uneven mess. After the first coat is dry, inspect the wall for any imperfections or areas that need more coverage. Then, apply a second coat of paint using the same technique as before. Let the second coat dry completely, and then carefully remove the painter's tape. Stand back and admire your handiwork – you've just transformed your space with a stunning black accent wall!
Step | Description | Tips |
|---|---|---|
Cutting In | Paint edges with an angled brush | Use a steady hand, don't overload the brush |
Rolling | Apply paint with a roller in smooth strokes | Maintain a wet edge, overlap strokes slightly |
Second Coat | Apply a second coat after the first is dry | Inspect for imperfections, use same technique |
Styling and Decorating Around Your New Black Accent Wall
Styling and Decorating Around Your New Black Accent Wall
Balancing Act: Light and Dark
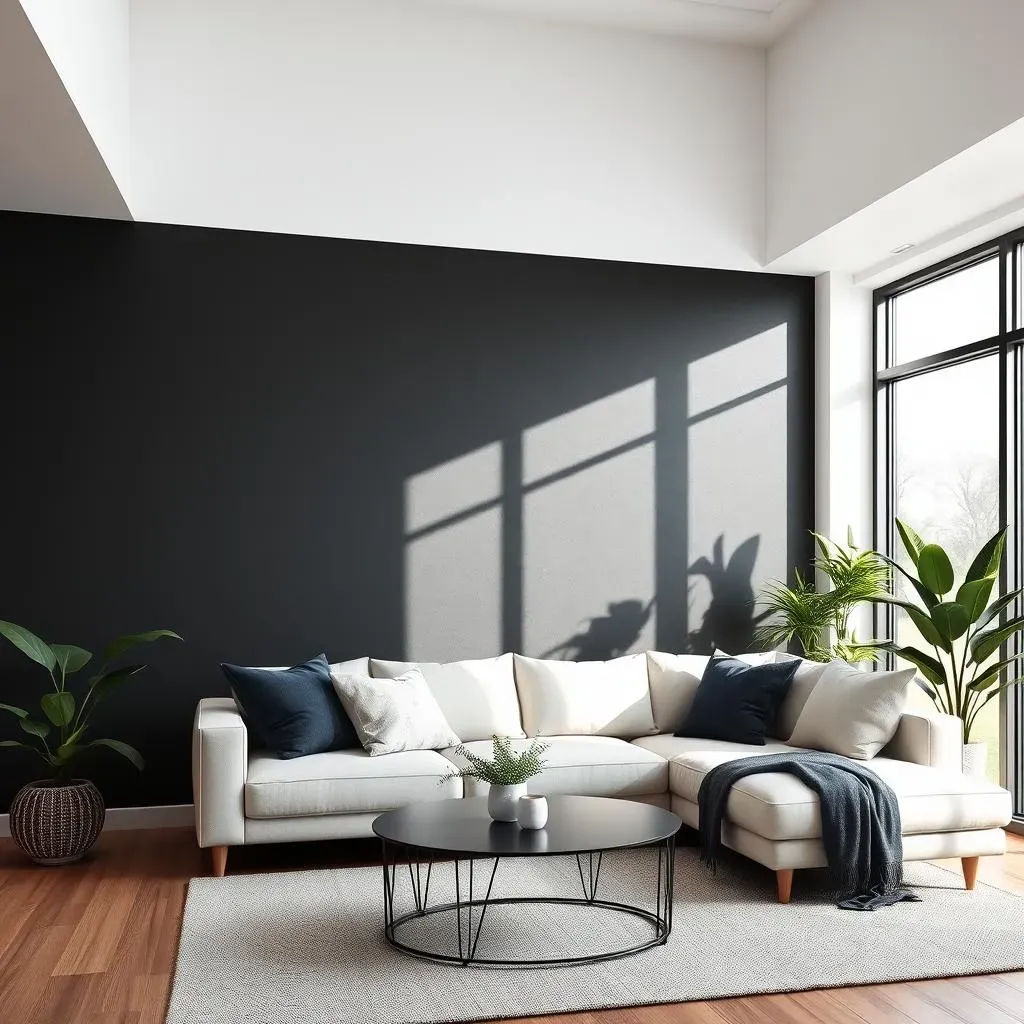
you've got this amazing black accent wall, but now what? The key is balance! Black is a powerful color, so you need to make sure it doesn't overwhelm the space. Think about bringing in lighter elements to create contrast. A crisp white sofa, a fluffy cream-colored rug, or even just some strategically placed light-colored throw pillows can make a huge difference. It's all about creating a visual harmony between the dark and the light. You don't want your room to feel like a dark cave; you want it to feel chic and sophisticated.
Also, consider the amount of natural light in your room. If your room is already on the darker side, you might want to add some extra lighting to brighten things up. A statement floor lamp, some well-placed table lamps, or even some string lights can add a warm and inviting glow. Remember, the goal is to create a space that feels balanced and comfortable, not gloomy and oppressive. So, play with light and dark until you find the perfect equilibrium.
Adding Pops of Color and Texture
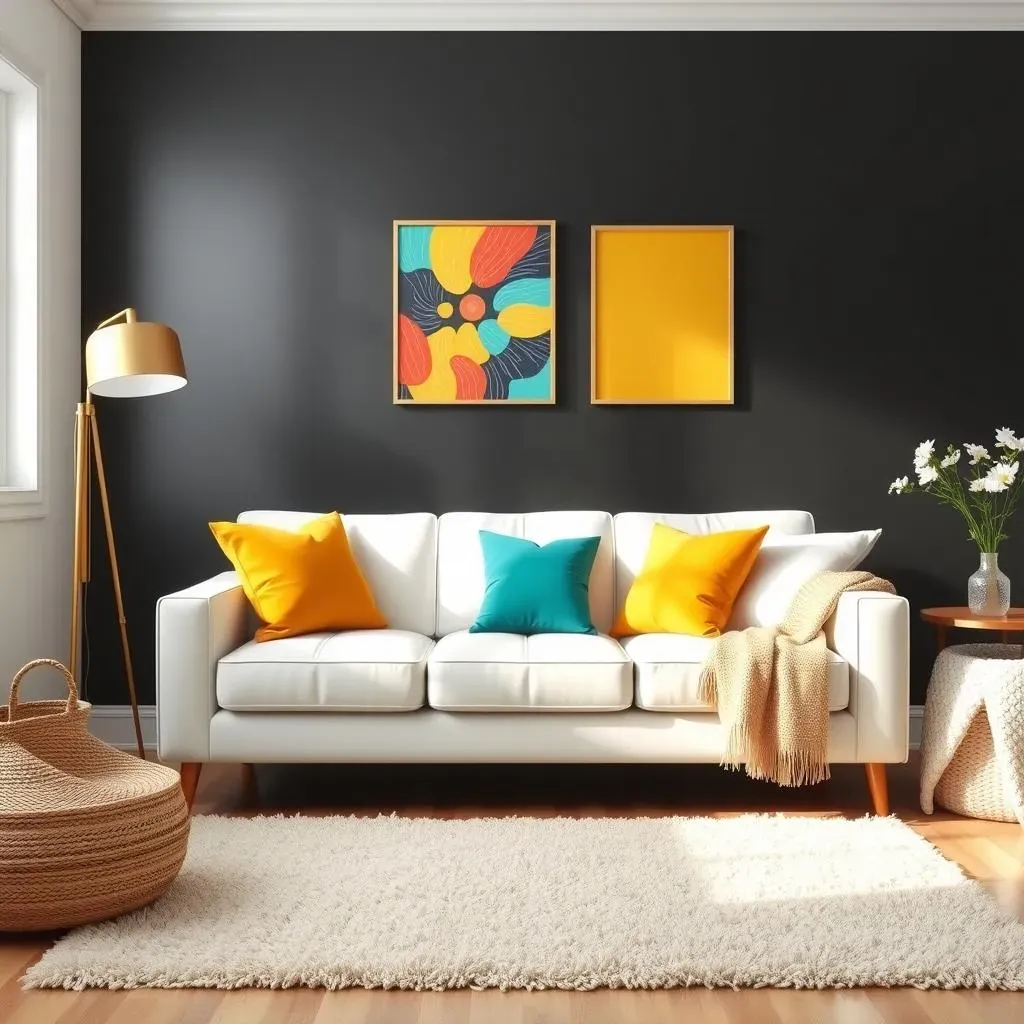
While a black accent wall looks fantastic with neutrals, don't be afraid to inject some personality with pops of color and texture. Think about adding some vibrant artwork, colorful throw blankets, or even just some fresh flowers. A black wall is like a blank canvas – it can handle almost any color you throw at it. Metallics like gold, silver, and brass look particularly stunning against black, adding a touch of glamour and sophistication.
Texture is also key to creating a visually interesting space. Think about adding some tactile elements like a chunky knit throw, a velvet pillow, or a woven basket. These textures will add depth and dimension to your room, making it feel more inviting and cozy. Don't be afraid to mix and match different textures – a smooth leather sofa paired with a fluffy sheepskin rug can create a stunning contrast. Ultimately, it's all about creating a space that reflects your personal style and makes you feel happy and comfortable.
Element | Suggestion | Why it Works |
|---|---|---|
Light | White sofa, light rug, extra lamps | Creates contrast and prevents a dark, cave-like feel |
Color | Vibrant artwork, colorful throws, flowers | Adds personality and prevents a monochromatic look |
Texture | Knit throws, velvet pillows, woven baskets | Adds depth and dimension to the space |
Embrace the Dark Side: Your Black Accent Wall Awaits
So, you've reached the end of our deep dive into the world of black accent walls. Hopefully, you're now armed with the knowledge and confidence to tackle this project like a seasoned pro. Remember, a black accent wall isn't just a coat of paint; it's a statement. It's a way to add depth, drama, and personality to your space. Don't be afraid to experiment with different shades, textures, and styling options to create a look that's uniquely you. With a little planning and effort, you can transform any room into a sophisticated sanctuary. Now go forth, embrace the dark side, and create an accent wall that's sure to turn heads!