Table of Contents
Ever looked at a plain wall and thought, "It needs something...more?" I did, and that’s how my obsession with geometric wood accent wall ideas began. Forget boring, flat surfaces; we're talking about adding depth, texture, and a whole lot of style. This isn't just about slapping some wood on a wall; it's about crafting a statement piece that screams "you." In this article, I'll walk you through my own journey of creating a geometric wood accent wall, from the initial spark of inspiration to the final, satisfying touch of paint. We'll cover how to plan your design, get the precise measurements and cuts, then install and finish it like a pro. Think of this as your personal guide to transforming any room from drab to fab. Get ready to unleash your inner designer and let's make some wall magic happen! We'll start with planning, then move to the construction, and finally, the finishing touches. So, grab your tools, and let's get started!
Planning Your Geometric Wood Accent Wall Ideas

Planning Your Geometric Wood Accent Wall Ideas
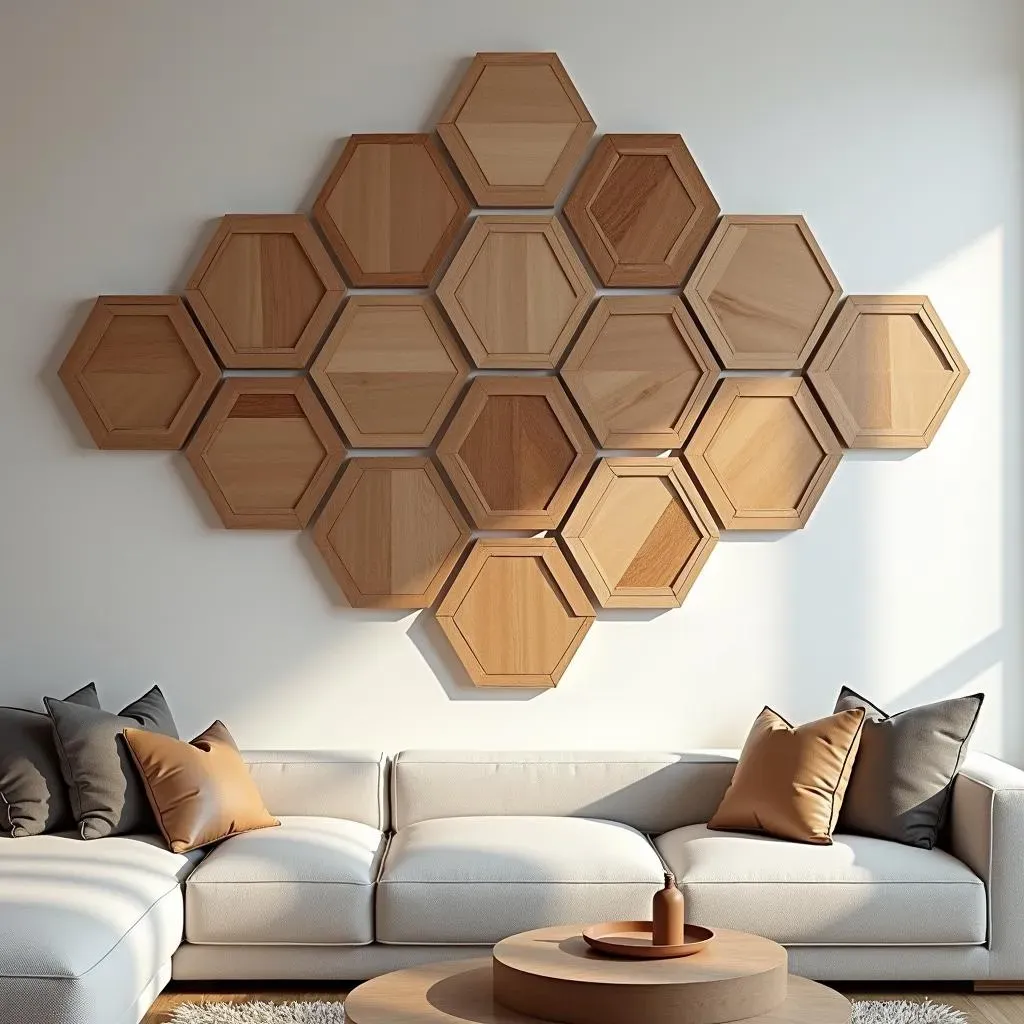
Dreaming Up Designs
so you're itching to create a geometric wood accent wall, that's awesome! First things first, let's talk design. Don't just jump in headfirst; take a moment to really picture what you want. I started by scrolling through Pinterest and Instagram, saving every single image that caught my eye. It was like a digital treasure hunt, collecting ideas for shapes, patterns, and even wood colors. I even sketched out a few designs on a piece of paper, some were totally wild, others were more simple but it was helpful to visualize it. I ended up with a bunch of different looks, and some of them were totally different from the others, which was fun.
Don't be afraid to mix and match different elements. Maybe you love the clean lines of a chevron pattern, or the bold look of a diamond design. The key is to find something that speaks to your style. Think about the room you are working with, too. Is it a bedroom, a living room, or a dining area? The size of the room and the existing decor will influence your design choices. For instance, a smaller space might benefit from a lighter wood and a less complex pattern to avoid overwhelming the area.
Tools and Material
Before you even think about picking up a saw, let’s nail down the essentials for this project. You’ll need some wood, obviously. I opted for primed 1x2 MDF boards because they are consistent in size and easy to work with, but you can use whatever tickles your fancy. A brad nail gun is your best friend for this project, making the install a breeze. You’ll also need a level, a measuring tape, and a pencil. Oh, and don’t forget safety glasses; we want to keep those peepers safe, right? And for the cutting, a miter saw or a hand saw will do the trick.
Once the wood is up on the wall, you will need wood putty to fill those nail holes. Caulk is also crucial, it smooths out those seams for a clean, polished look. For the finishing touches, grab your favorite paint color and some brushes; I used a small craft brush for the tight spots to get a seamless finish. Remember, good preparation is half the battle; it's like prepping for a marathon; you can't just show up and expect to win. I’m telling you, having all your tools and materials ready before you start will save you so much time and headache.
Material | Purpose |
|---|---|
Primed 1x2 MDF boards | Creating the geometric pattern |
Brad nail gun | Securely attaching wood to the wall |
Level | Ensuring straight and even lines |
Measuring tape | Accurate measurements for cuts |
Pencil | Marking cutting lines |
Miter saw or hand saw | Cutting wood to desired lengths |
Wood putty | Filling nail holes |
Caulk | Smoothing seams |
Paint | Adding color and style |
Paint brushes | Applying paint |
Creating and Installing Your Geometric Wood Accent Wall
Creating and Installing Your Geometric Wood Accent Wall
Making the Cuts
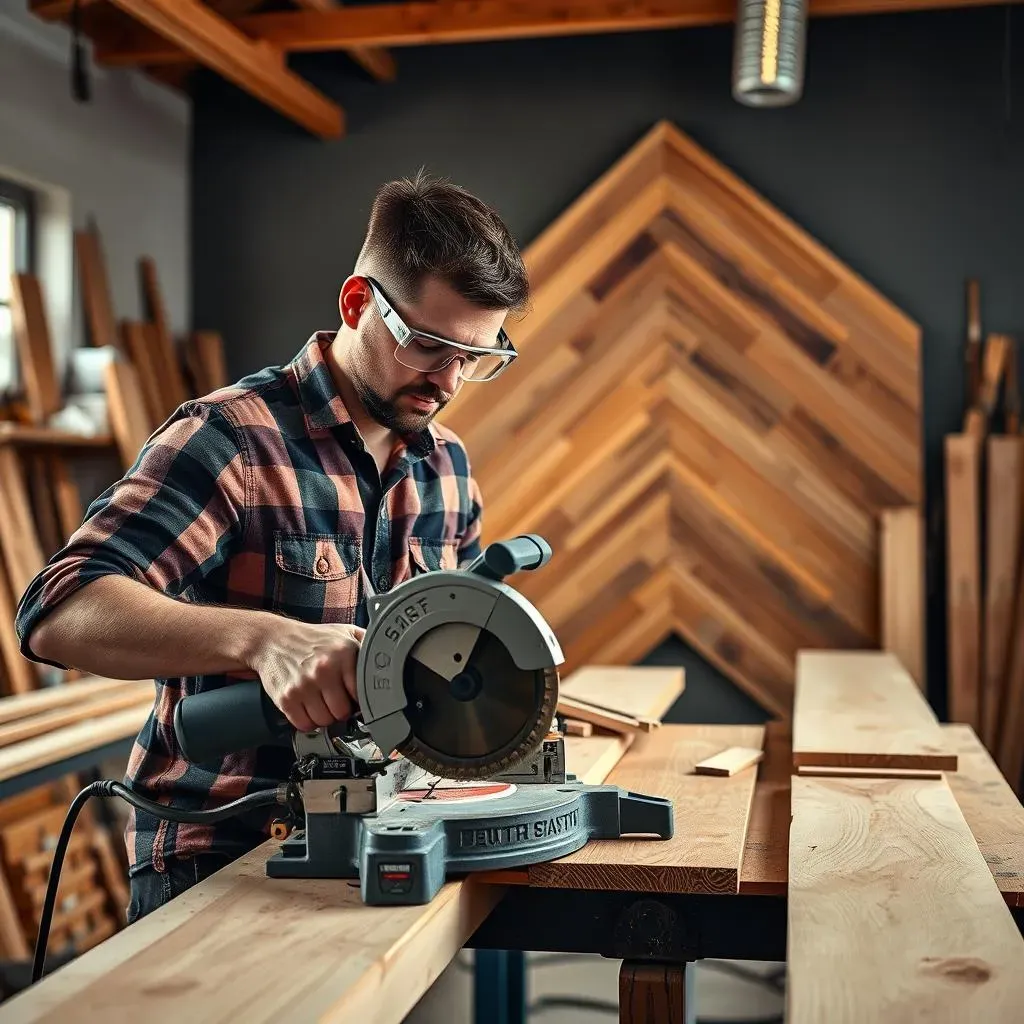
Alright, so you've got your design, your wood, and all your tools. Now, it's time to get cutting. Measure twice, cut once, that's the golden rule, people! I marked all my wood pieces, making sure each one was the exact length I needed. For my design, I stuck to 45 and 90-degree angles, which made things a bit easier. If you're going for something more complex, just take your time and double-check those measurements. A miter saw is seriously the MVP here, making clean, precise cuts that'll make your finished wall look super sharp. It’s like giving your wood a fresh haircut; you want it to look its best.
Don't rush this part. It's better to take your time and get the cuts right than to have to redo it later. Trust me, I learned that lesson the hard way. I made a couple of mistakes, cutting pieces too short, which is why you should always double-check. But hey, that's part of the process, right? It’s all about learning and getting better. Once you have all your pieces cut, lay them out on the floor to see how it all fits together, it's like a puzzle, and you want to make sure all the pieces are in the right place before you start gluing them.
Getting It on the Wall
Now for the fun part: putting it all together on the wall. I started by marking the center of the wall, then worked my way out from there. It's like building a house, you need a solid foundation, so make sure your first piece is perfectly level, use your level to make sure every piece is straight. I used my brad nail gun to attach the wood pieces to the wall, making sure they were nice and snug. It’s amazing to see the design come to life piece by piece; it’s like watching a drawing turn into a real thing.
Having an extra pair of hands during this stage is a lifesaver, you know, someone to hold the wood while you’re leveling and nailing. My partner helped me with this part, which made it a breeze. If you're doing this solo, take it slow and steady, and don't be afraid to adjust as you go. Remember, the goal is to create something you love, so enjoy the process and don’t worry about perfection. It’s like cooking, you can always taste and adjust, and in the end, it will be delicious! Once all the wood is on the wall, take a step back and admire your work, you are almost there!
Step | Action | Tip |
|---|---|---|
1 | Measure and mark wood | Double-check measurements |
2 | Cut the wood | Use a miter saw for precise cuts |
3 | Mark the center of the wall | Start from the middle |
4 | Attach wood pieces to the wall | Use a level for straight lines |
5 | Get help from a friend | It makes the process easier and faster |
Finishing Touches for Your Geometric Wood Accent Wall
Finishing Touches for Your Geometric Wood Accent Wall
Filling the Gaps
so you've got all your wood up on the wall, looking pretty sharp, right? But before you start patting yourself on the back, there’s still some work to do. You see those little nail holes? They're like tiny blemishes on a beautiful face, we need to fix them. Grab your wood putty and fill those suckers in. Don't be shy, just slather it on, then use a putty knife to smooth it out. Once it’s dry, a little sanding will make everything flush, you will see, all those tiny holes will disappear like magic. After the putty, caulk is your next best friend, it’s like the secret sauce that ties everything together. Run a bead of caulk along all those seams where the wood meets the wall, it will make the whole thing look seamless and professional. It's like giving your wall a makeover, making it look polished and sleek.
This step is important, don’t skip it. It’s the difference between a DIY project that looks okay and one that looks like it belongs in a magazine. I know it might seem a bit tedious, but trust me, it’s worth it. It’s like cleaning your room before you have guest, you want everything to look its best. Once you are done with the putty and caulk, you can take a break and admire your work; you are almost done, just a little more paint, and you are all set. So don’t rush this, take your time and do it right.
Painting and Final Reveal
Alright, the moment you've been waiting for: painting! Choose your favorite color and get ready to transform that wall. I started by using a regular roller for the main areas, then switched to a small craft brush to get into those tight spots. It’s like coloring in a coloring book, but you are painting a wall. I gave my wall two coats of paint for good measure, making sure every nook and cranny was covered. Remember to let each coat dry completely before adding the next one, patience is key here. It will be worth it, I promise, it will look like a brand-new wall.
Once the paint is dry, it’s time for the grand reveal! Step back, take a look, and soak in all your hard work. You did it! You created a beautiful geometric wood accent wall that will be the envy of all your friends. It’s like finishing a marathon, you are tired but also proud of what you accomplished. I was so happy with how mine turned out; it was exactly what I had envisioned. It’s amazing how a little bit of wood and paint can completely transform a room. Now, all that’s left to do is enjoy your new space and start thinking about your next DIY project.
Step | Action | Tip |
|---|---|---|
1 | Apply wood putty | Fill all nail holes |
2 | Sand the putty | Smooth out the surface |
3 | Apply caulk | Smooth all seams |
4 | Paint the wall | Apply multiple coats |
5 | Admire your work | Enjoy your new wall |
Wrapping Up Your Geometric Wood Accent Wall Journey
So, there you have it – a complete guide to creating your own stunning geometric wood accent wall. It might seem daunting at first, but with careful planning, a bit of elbow grease, and maybe a few curse words under your breath, you can totally pull this off. Remember, it’s about making your space reflect your style, not about perfection. If I can do it, trust me, you can too. Now go forth, transform those boring walls, and bask in the glory of your awesome handiwork. And hey, if you mess up, just call it abstract art – I won't tell.